by Dan King | Jul 27, 2016 | social media marketing strategy, social media strategy
If blogging had a secret sauce or magic potion, this would be it. By far, this is the most common question I get asked about blogging and social media.
When is right time to share blog posts on social media?
I can confidently respond without hesitation…
It depends.
I’ll be honest. I really wish I could tell you an exact formula for sharing your (amazing) blog posts so they reach the millions of people who need to be reading them. But the reality is that there isn’t a formula.
With that said, there are some things you can do that’ll help you figure it out. With a little bit of testing, measuring, and retesting, you’ll find the right answer for you pretty quickly. In no time at all, you’ll be able to share blog posts like a boss.
The First Key to Social Media Success
It’s not about you.
First and foremost, the success of your blog posts in the world of social media has nothing to do with you. Well, maybe a little bit. Many bloggers misunderstand social media success as having to do with getting the right mix with when and how they post their content. However, if it only depended on your sharing, then it’s not really social, is it?
If you want to find success in social media, then you need to be thinking about how other people share your content. Your role in that is two-fold:
- Create content that’s share-worthy. Think about blog post titles that make readers want to click. Think about eye-popping images that catch their attention. Think about writing content that would make them want to share with their friends because of how it moved them.
- Make it easy for them to share. I’m amazed at how many websites I visit where I can’t find social sharing buttons. Sure, I could copy/paste the blog post URL, but if I have to go to that much effort, you’ve already lost me. Share buttons should be highly visible and easy to use.
Finding the Right Times
While most of your success comes from how other people share your content, you’ll still want to optimize how you share your blog posts for maximum reach. This is where you’ll want to experiment with different types of posts (text, images, links, and videos) at different times of the day.
Social media gurus will look at the data and tell you that you should be posting your content at 2pm on Thursday afternoons (or some other flavor of the month). However, that’s based on meta-data from thousands of accounts, not your data.
So how do you find the optimum times for your accounts?
For Facebook
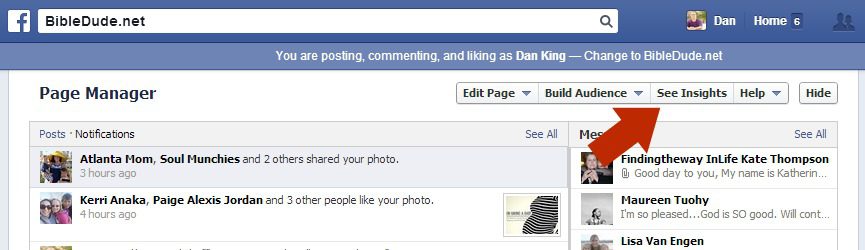
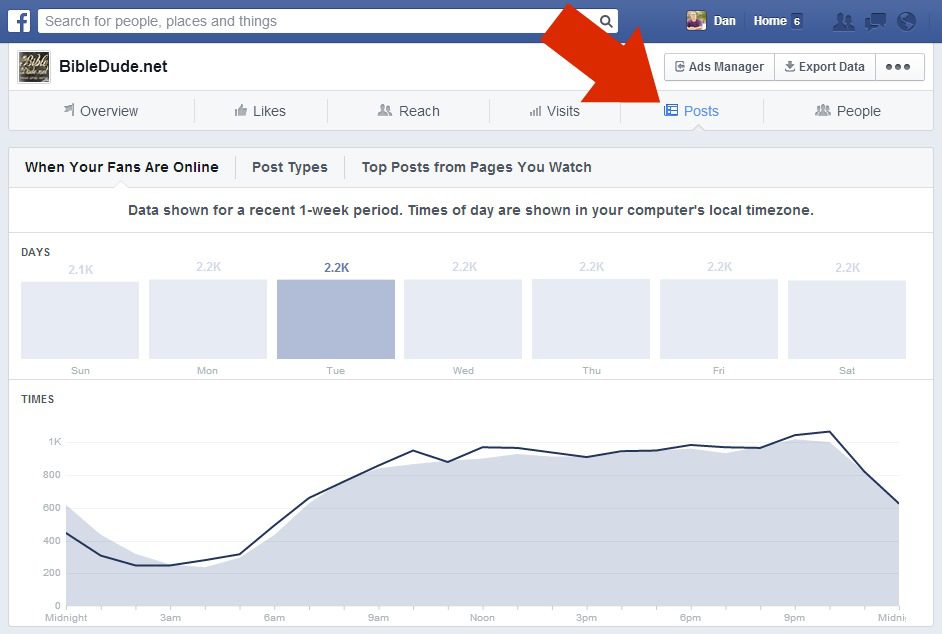
If you run a Facebook page for your website, then you’ll have access to Insights for your page.
In your Insights, you’ll find “When Your Fans Are Online” on the Posts tab. The initial chart shows general population volume, but when you mouse over different days of the week you’ll see when your fans are online that day. This is based on recent data specific to the people who are fans of your page. Note that when your followers are online will vary from day to day.
For Twitter
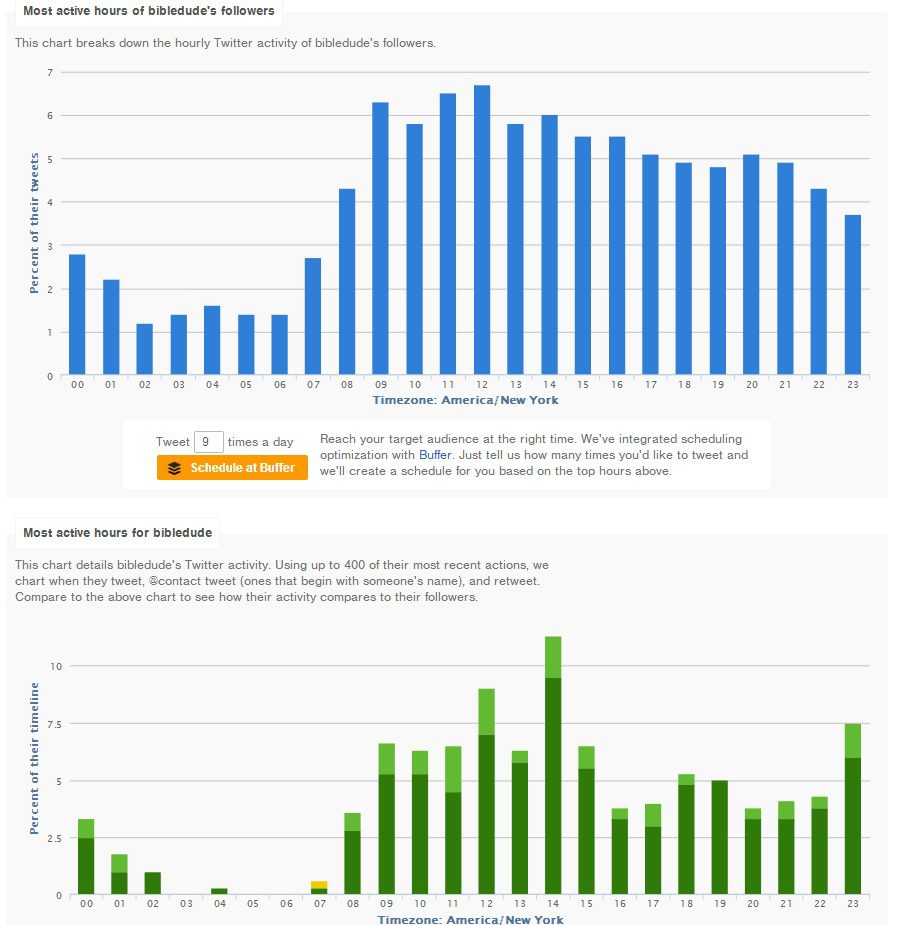
You can find similar data for Twitter using third-party tools, like Follwerwonk. Once you sign in with your Twitter account, you’ll be able to analyze followers… both those who follow you, and those who you follow. You’ll get a great deal of demographic information about your followers, and a detailed chart of when they are most active on Twitter.
I want to draw special attention to that “Schedule at Buffer” button below the top chart. That brings me to my next point…
Buffering Your Way to Success
Once you’ve figured out the best times to schedule your posts, then you can plug that information into a tool like Buffer. In Buffer, you’ll be able to create a custom schedule for each of your social media profiles and set the times you want to post. You can even schedule different frequency and posting times for each day of the week. In the example below, you’ll see that I set my schedule to reflect the peak times for my Facebook page on Tuesdays.
This is where that “Schedule at Buffer” button in Followerwonk comes in handy. You can select a frequency for scheduled posts in a day, and automatically import an optimum posting schedule into Buffer.
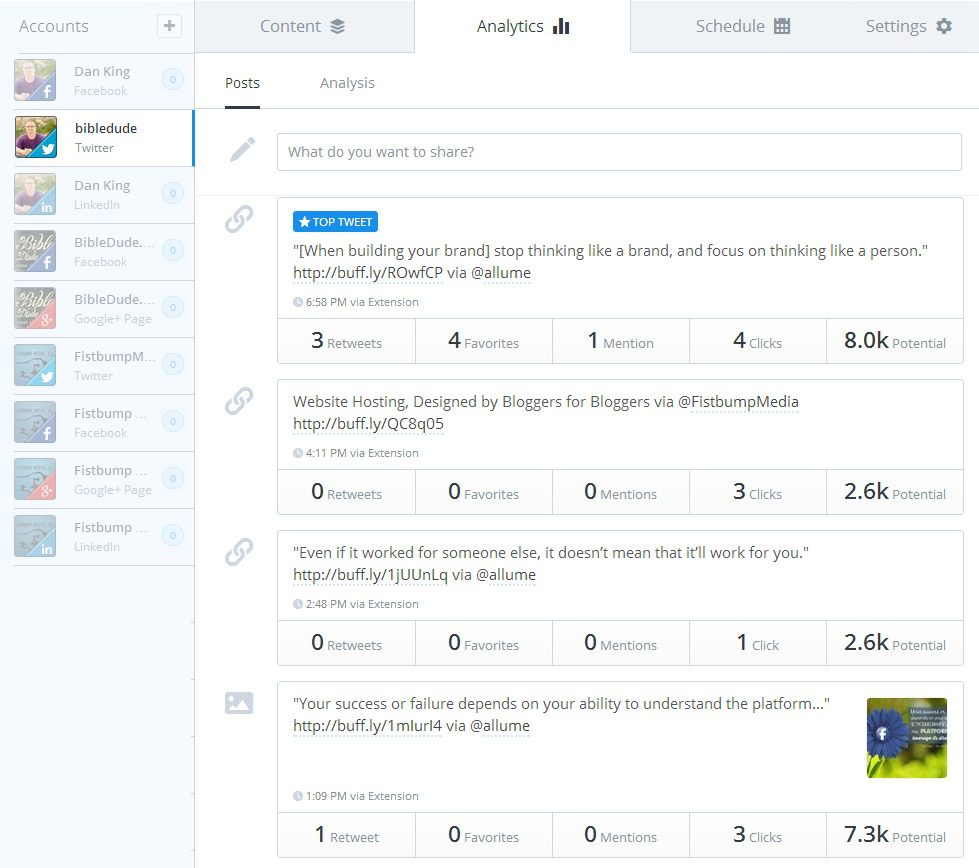
One of my favorite parts of Buffer is the analytics for the posts you share (only through Buffer). Based on interaction thresholds, you’ll get a good idea of what kinds of social media posts are resonating the most with your audience.
It’s important to note here that using Buffer for scheduled posts doesn’t mean that everything you do on social media needs to be scheduled through Buffer. It is, however, a great tool that will help you push your blog posts out to different platforms at predetermined times, making sharing much simpler.
CoSchedule: A Premium Solution
If your blog is on (self-hosted) WordPress, then you can use some cool tools like CoSchedule. This WordPress plugin comes with a small monthly fee, but it has some pretty slick scheduling functionality. Basically, while you in your Edit Post mode, you can also create your social media posts to publish at whatever times you specify. Create, text, image, and link posts to run at the same time that your blog posts publishes. And then run a different kind of social media post at x-number of hours after the blog post publishes.
If you publish your blog post at 6am, you can publish a link post to Facebook at 6am, then an image post 5 hours later, and a text post 10 hours later. Then think about the Twitter and Google+ posts you want to send out in order to get the best coverage for when your followers are most likely to see it. Everything is triggered automatically based on the publishing of the blog post. CoSchedule even has a slick calendar that shows you all scheduled blog and social media posts for easy management.
Last thought…
The best thing you can do to determine what social media posting methods and schedules are best for you is to test, measure, adjust and test again. When you share blog posts, pay attention to the types of social media posts you run at different times, and how well each of those resonates with your followers. Before long, you should be able to pick up on some trends and patterns with your followers that will help you optimize every post you make…
Like a boss.
Note: This post was originally published on the Allume Blog.
by Dan King | Jun 10, 2016 | publishing strategy
One of the most frequent questions I get from new authors is, “Should I make a website for my book?” The answer is, it depends. Here’s why.
My first question is, why would you want a website for the book? So people can find the book? You don’t need a whole website for people to find the book. Google does a great job of indexing Amazon book pages already, so people searching for it can find it without a whole website being there. Is it for marketing the book? Marketing can be done anywhere, so a whole website isn’t really needed for that either.
Here’s the thing with building a website with the intent of it being a tool to help your book get found. Search engines these days are always looking for fresh, relevant content that answers people’s questions. So if you build a full website for the book, then it really needs an active content strategy so that fresh content continues to produce relevancy for search engine users. This means you probably shouldn’t build a full, stand-alone website for your book unless you plan to have a long-term strategy for content development. So I’m not saying don’t do it, but if you do, then there are some things you should consider…
How To Make a Website for My Book
The trick here is that any website you create should provide some sort of value to your potential audience, not just the fact that you can help them out by selling them your book. Whatever topic your book is on, the website should provide a wealth of information on that subject. Provide additional stories, resources, and information on the topic. Maybe even ride the wave of current news and events that connect with your theme.
Here are a few considerations for a strong book website strategy:
- Don’t just make it a sales landing page. Make it a valuable resource. The more you can position the book and the website as something valuable, the more likely they are to want to buy the book. You should be shooting for a show-don’t-tell approach to website development. Forget the snazzy sales copy, and show them how helpful all of this is for them.
- Have an ongoing content (blog) strategy. Plan to continue to produce valuable content, especially if you can focus on current news and trending topics. This will show that your book is always valuable, not just during the first 90 days after you launch it.
- Sell more than just the book. Specifically, sell yourself as the author of that book. Leverage the site to help you book speaking engagements and cross-sell other book projects you may have going on.
- Grow that mailing list. This is probably the most important item on this list. Offer a free download, maybe a short e-book or special audio/video just for subscribers. Get them on your blog subscription email list. The more you can build that list, the better off you’ll be when you’re ready to launch that next book.
Book Website Alternatives
If you don’t plan to have an ongoing blog content strategy, or if your project simply doesn’t warrant it, then there are some simple alternatives. You can still buy the domain name for your book, but then you can point that domain name anywhere you want.
For example, one of my books is The Unlikely Missionary: From Pew-Warmer to Poverty-Fighter. I used to have a stand-alone website for it at theunlikelymissionary.com, until I realized how much work it was trying to maintain relevancy there in addition to the work I was also doing on my main blog (which lead up to that book project). It was simply too much to manage. Now, the domain name points to a book page on my blog, which is where my primary focus is.
The process is simple. First, you can buy the domain name for your book. If the .com name isn’t available, then try one of the hundreds of other not-com names, many of which may work better (i.e. you can get names ending with .life, .family, .community, and many more). Many of these can be bought for under $30 per year, so it’s not expensive to maintain.
Once you have the domain name, then you can point it anywhere you’d like. A couple great options are:
- A book landing page on your website. One awesome way to do this (for WordPress users) is to use the MyBookTable plugin to create the book landing page. The plugin has a strong template for building the basic page, and then you can add whatever other information and resource you want to the rest of the page. It’s a good idea to include things like endorsements, social media shareable resources, and maybe even links to blog posts on the site that dig deeper into the topic. And if you need a place to host your website, then check out some of our incredible WordPress hosting plans.
- A Facebook book page. This would also require some ongoing content strategy, but it might be easier to manage when you’re sharing posts from your main blog related to the topic of the book. You could also share other links and micro-content (graphics, quotes, etc) that would help readers connect at a deeper level. This could be an amazing tool for keeping conversation going, and continuing to market your book (as part of a solid Facebook content strategy).
Whichever direction you go with this, the key is to add value and simplicity for the user on the other end. There are many more factors to successfully launching a book, but regardless, it’s a great idea to own the domain name to the book title. The important thing is what do you want that experience to be like for the potential reader who goes there.
by Dan King | Feb 5, 2016 | social media marketing strategy
With all of the talk about how Facebook is changing algorithms to push down your page’s posts, there’s finally something to look forward to! It’s called Facebook Audience Optimization, and it’s a new tool which allows Facebook Page publishers to better target the audience for each post, making it more likely that your content will be seen by the people who really want to see it.
But why not show all of your posts to all the people? Well, that’s not great marketing, to be honest. Remember:
That’s where Audience Optimization comes in. It allows you to tag a preferred audience who is most likely to be interested, or remove those who are least likely to be interested with audience restrictions. And it will give you audience insights to help you understand which interest tags are having the greatest impact with viewers of the posts.
Getting Started with Facebook Audience Optimization
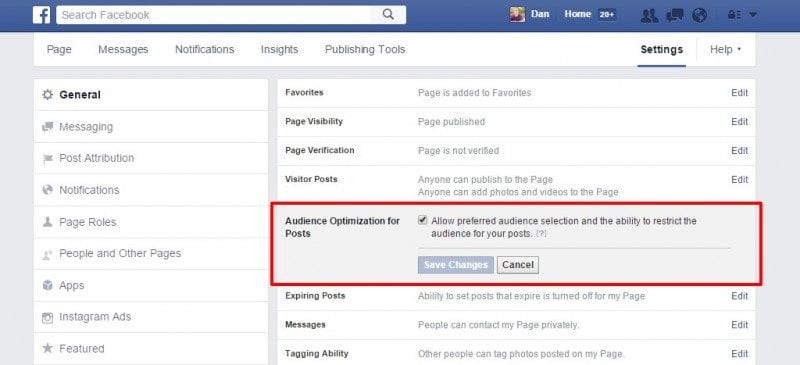
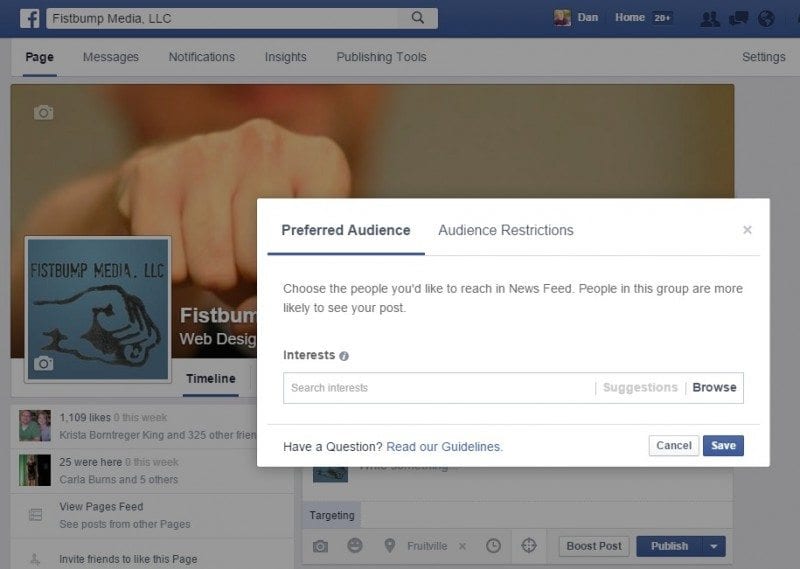
Before you can use Audience Optimization on your Facebook Page, it must be allowed via your Page settings. To enable this feature, go to Settings > General > Audience Optimization for Posts, check the box to allow the feature, and click on the Save Changes button.
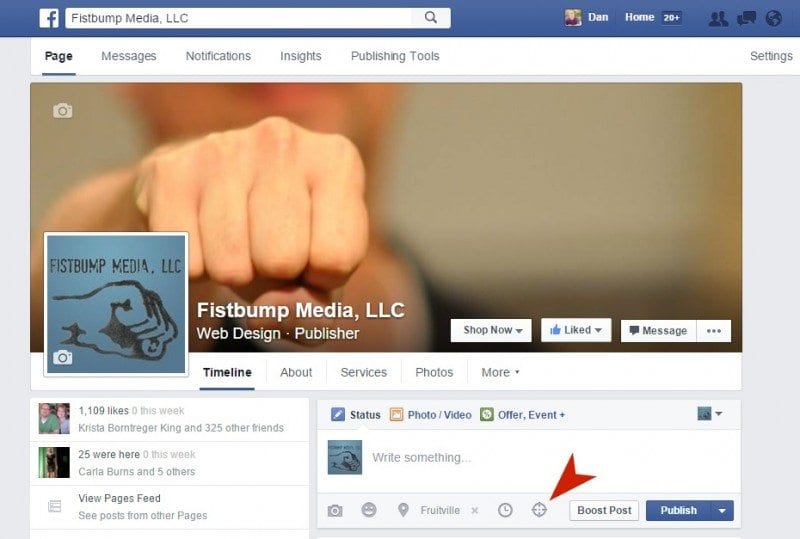
Once the feature is enabled, then you’ll be able to use Audience Optimization when creating posts on your Facebook Page by clicking on the targeting icon.
This will open the tool which allows you to select your preferred audience and/or audience restrictions.
Getting the Most Out of Facebook Audience Optimization
When using a tool like this, it’s worth mentioning that you’ll need to think first about how people consume your content, not just who you want to get your content in front of. There may be some people who you believe need to see your post, but if they don’t want to see it, then your efforts will not produce the engagement needed to lift it in Facebook’s algorithms. So target the audience who is most likely to like, comment, and (most importantly) click.
Facebook suggests several tips for tagging your posts, including the following:
- Target audiences with relevant tags – What matters most? Think about the interests which are most relevant to that post.
- Tag with a mix of broad and narrow terms – “…think about the classic “who, what, where, when, why and how” elements of the story as a starting place.”
- Think associatively about related interests – Which topics or interests overlap the main ideas you’re tagging in the post?
- Consider including organizations and brands – This is also about finding the overlap in interests.
- Use tags with small audiences strategically – It’s not always about reaching LOTS of people, but finding the people who will be most passionate about your content.
Getting your content in front of the right people can pay huge dividends for your blog/website. And using a tool like Audience Optimization can help your content get the right kind of reach. Despite what many may believe, Facebook relies on your content. The idea that they are pushing it down is more about them getting the right pieces of content they believe people want to see in front of them. Adding these kinds of tags to your posts helps them filter and better match your posts with the people who will want to engage with that content.
How are you using Facebook Audience Optimization, and have you noticed any difference in engagement as a result?
by Dan King | Jan 18, 2016 | social media marketing strategy, social media strategy
Most people believe that increasing social media exposure is all about getting more followers. That’s not entirely true. Certainly, building your own social media following is important, but consider this question…
I regularly tell clients that it’s more important to enable and get other people to share your content than it is to build a massive following yourself. In fact, your social media following will inevitably grow if you are effectively getting other people to share your stuff.
And before I get into the practices I suggest for social sharing, it’s worth stating that the first thing you need to do is to create something worth sharing. Your content must be strong if you expect other people to put in front of the people they know. It shouldn’t be something that only tells your story, but also connects with their story. The more people can relate to your experience and say resoundingly, “Yes! That’s me too!”, the more likely they are to share across their networks.
With that said, here are four things I suggest you do with every post in order to maximize your social media exposure:
1. Rock your social media sharing buttons
The first thing you should be thinking about is how you make social sharing easy for your readers. Typically, every action you require a visitor on your website to take in order to accomplish something, the more likely they are to drop off somewhere in the process. Several studies have shown that social like/share buttons at the top of a post get more clicks than the ones at the bottom of a post. Some visitors will visit the page, and because they like you and or your topic in general, they’ll click that button before even reading the rest of the post (an extra action required in order to get to the same buttons at the bottom of the page).
Using the same thinking, floating sidebar buttons tend to get more engagement because they’re always visible, no matter where the reader is. So whenever they decide they like it, and the urge hits them to share, they don’t need to go anywhere else to find how to share. The option is simply always there.
With your social sharing options, you’ll want to make sure you’re offering sharing options for most popular networks, even if you aren’t on them. The idea of social sharing is more about enabling people to share where they want, not just where you are. Think about who your typical reader is, and where they may have profiles.
There are several great plugins for implementing a floating sidebar for social sharing, and our favorite is Monarch from Elegant Themes. The reason we like this one so much is because of the flexibility in design, and the built-in sharing metrics.
2. Use a social media friendly image
What I’m talking about here is more than simply having a nice-looking image on your post. Instead, think about your images as an additional stand-alone piece of micro-content. Create quote images or other stylized images that people will want to share. Think about whether an image has value outside your post if someone were to see it on Pinterest, for example. Ideally, once it’s shared by someone to Pinterest (or anywhere else), it’ll be linked back to your website. But the image can take on a life of its own if it is good content by itself, reaching far more people that you might expect.
Use tools like PicMonkey or Canva to create amazing graphics to share on your posts. And every post should have an image. No exceptions.
Additionally, whether you are on Pinterest or not, you should be using a plugin which will place a Pin It! button on your images, making it easier for your readers to share that piece of content. There are several good ones out there, like this one…
3. Use click-to-tweets in your post
Another piece of micro-content which should be included in every post is pre-made tweets. These click-to-tweets empower your readers to share key ideas from your posts with a single click. Additionally, when you use a plugin like Click To Tweet (linked below), it also creates a nice visual break in your content, making it easier for your reader to scan for key ideas.
So think about what might be some of the biggest, most important ideas from your post, and turn those into click-to-tweets. Having other people sharing tidbits of your wisdom is a great way to establish greater credibility regarding the topic you write about. And having it ready for them means fewer steps to share those ideas (again, making it more likely that it will get shared).
4. Schedule your own social media posts
Every blogger also knows that once you publish a post, you should be sharing it on your own social media. However, many bloggers share once, hoping that everyone who needs to see that post will see it. The reality is that social media posts have a limited lifespan. So having a strategy for sharing your own content multiple times can increase your chances of people seeing it. Kissmetrics suggests a schedule for sharing your content that looks something like this:
- Twitter: On publish, two hours later, next day, next week, next month, and two months later
- Facebook: On publish, and next month
- Google+: On publish, next week, and next month
You can play around with these timings, and if you use a tool like Buffer, then you can easily schedule all of these all at once, and monitor the metrics for how each post is performing with clicks-thrus back to your website. Additionally, Kissmetrics suggests mixing up your posts so they don’t all look the same. Your mix should contain variations such as these:
- Straight and Easy: Post Title + Link
- The Question: Ask an engaging question to stir conversation
- Cite a Fact: Share a fact or figure that is included in your post
- Share a Quote: Grab a pull-quote from your article and turn it into a social message
- Add Intrigue: Write a teaser message that grabs the attention of your readers
Once you find a posting schedule that works for you with the networks you are on, and enable others to share your content (and micro-content) on a regular basis, then you’ll be well on your way to maximizing your social reach with every post.
Photo by Sarah Joy, used via Creative Commons from Flickr. Image design by Fistbump Media, LLC.
by Dan King | Jul 30, 2015 | publishing strategy
Where (and how) should you publish your e-book. There are lots of options available. And if you’re self-publishing your work, then you’ll need to figure out which ones are right for you. In this short clip from the Fistbump Media webinar on e-book publishing, Dan discusses how you can make the right decision to meet your goals, and which platforms he uses (and why).
Here’s one tip from Dan on this topic…
Where (and how) do you prefer to publish your e-books, and why?