by Dan King | Jul 29, 2026 | blogging strategy, business strategy, publishing strategy
You’ve got a book that won’t come together. Or a business pulling you in ten directions at once. You know AI is supposed to help with this, so you open ChatGPT, type something in, read the output, and think… that’s not quite it.
You try again.
Still not quite it.
Eventually you close the tab, no closer to unstuck than when you started.
If that’s familiar, you’re not doing it wrong. You’re just missing the part almost nobody teaches you.
The problem was never access to AI
Everybody has AI now. It’s not a resource anymore, it’s a given. You can open a half-dozen tools right now for free or close to it.
So if access were the answer, you’d already have your clarity. The fact that you don’t points to the real issue, which isn’t the tool at all. It’s that using AI well isn’t about knowing the right prompt to type. It’s about systems thinking, approaching your problem in a structured way and knowing where AI actually fits into solving it. And that kind of thinking doesn’t come naturally to everyone. There’s no reason it should. It’s a skill, and most people were never shown how to do it.
That’s why generic AI advice keeps letting you down. “Ten prompts to outline your book.” “Five ways to use AI in your business.” That stuff is written for everyone, which means it’s really written for no one, and definitely not for the specific thing you’re stuck on right now. You don’t need more prompts. You need to see how the whole thing fits together for your work.
That’s exactly what a AI Blueprint Session is for.
What a AI Blueprint Session actually is
The AI Blueprint Session is a focused, one-on-one working session where I show you how to use AI to get unstuck and make real progress on the thing in front of you.
I want to be clear about that word “show,” because it’s the whole point. This isn’t me disappearing with your project and handing back a finished product. And it isn’t a service you have to keep paying for every time you get stuck again. It’s mostly educational by design. We sit down together, we work through your actual problem, and I show you how I’d solve it with AI, so that you walk away not just with a plan, but with a real sense of how to do this kind of thinking yourself going forward.
The goal is to set you up for success, not to make you dependent on me. I’d rather teach you to use these tools well than turn myself into a crutch you can’t work without. That’s better for you, and honestly, it’s the only version of this I’m interested in offering.
Same approach, pointed at your work
The thing you’re stuck on shapes what we focus on, but the underlying approach is the same either way.
If you’re a writer, we might work through your book’s core message, untangle a structure that’s gotten scattered, map out your chapters, or figure out how to tighten a draft that’s almost-but-not-quite there. AI becomes a thinking partner for the decisions that keep piling up when you’re trying to finish something.
If you’re an entrepreneur or small business owner, we might bring clarity to your offer, sharpen your positioning, sort out messaging that’s gotten muddy, or build a concrete plan for your next 30 to 60 days. AI becomes a way to cut through the noise and focus on what actually moves things forward.
Different work, same bones. Take the thing you’re stuck on, and build a clear path through it, with AI supporting your judgment instead of replacing it. (If you already know which fits you, you can head straight to the AI Author Lab or the AI Entrepreneur Lab.)
How it works
The process is simple, and it’s built so nothing gets lost.
Before we meet, you tell me what you’re working on. You send over the project and where you feel stuck, so I can review it ahead of time and come in ready to go. That means we spend our time solving, not catching up.
Then we meet for about an hour on a video call. I share my screen and walk you through exactly how to approach your problem with AI, in real time, using your actual work. You’re not watching a generic demo. You’re watching your own project come unstuck.
Afterward, you get two things: a personalized Blueprint, a written action plan that lays out what we worked through and your clear next steps, and the recording of our session, so you can go back to anything we covered whenever you need it.
You leave with clarity, a plan, and a reference you can return to.
What you actually walk away with
Here’s what that looks like in practice.
One recent Blueprint client was finishing a book and drowning in the hundreds of small decisions that come with it. She left the session with a clear message and purpose for the book, a structured table of contents, a consistent format to follow, notes on tightening her final copy, and a week-by-week plan to actually finish. The fog lifted, and the path forward was right there in front of her.
Here’s how she put it:
“The Blueprint session was amazing! It was just what I needed and more. I love how AI can be used as an organizational tool with options. As a writer finishing up a book, there are many details that involve decisions. AI is very helpful in getting your message across, organizing your chapters and tightening up your final copy.”
— Nancy D., AI Author Blueprint client
That’s the shift an AI Blueprint Session is built to create. Not “here’s a pile of AI output.” Instead, real clarity, a real plan, and the confidence that comes from finally seeing the way through.
Why this is the best place to start
If you’re stuck, the worst move is to commit to some big program before you even have clarity on the problem. You’d be scaling up effort on something that’s still foggy.
Start with the clarity instead. An AI Blueprint Session is the front door for exactly that reason. It’s one focused session, a real plan, and a genuine sense of how to keep using these tools well on your own. From there, if you decide you want ongoing support or a more intensive push, that path exists. But plenty of people find that the clarity from a single session is exactly what they needed to get moving again.
You don’t have to start big. You have to start clear.
The cost of staying stuck
It’s easy to underestimate what being stuck actually costs you. The book that stays unfinished another year. The business decision you keep circling without resolving. The months that slip by while you keep meaning to figure it out.
One focused session can change that. Not with hype, and not with some trick, but by showing you how to think through your problem with the tools already sitting in front of you, and giving you a clear plan to move forward.
If you’re ready to get unstuck, let’s figure out your next step together. Take a look at the AI Author Lab if you’re working on a book, or the AI Entrepreneur Lab if you’re building a business, and book the AI Blueprint Session that fits your work.
by Dan King | Jul 1, 2026 | fistbump media updates
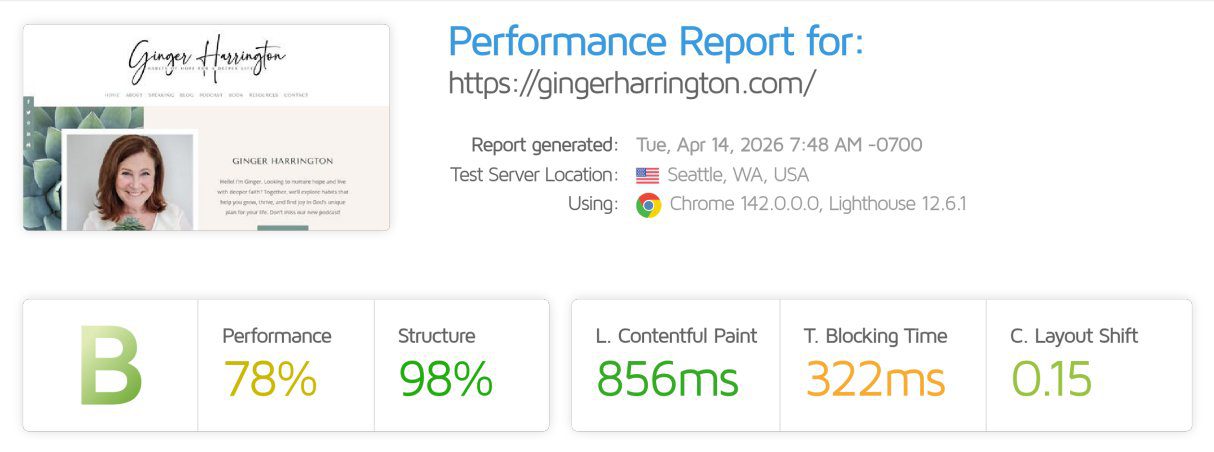
This site was already scoring a B on GTmetrix. Performance at 78%. By most standards, that’s a solid, healthy website. Nothing alarming.
Then we changed one thing. We didn’t touch the theme. We didn’t clean up plugins. We didn’t optimize a single image or rewrite a line of code. We changed where the site lived, moving it from a shared hosting plan to a dedicated environment.
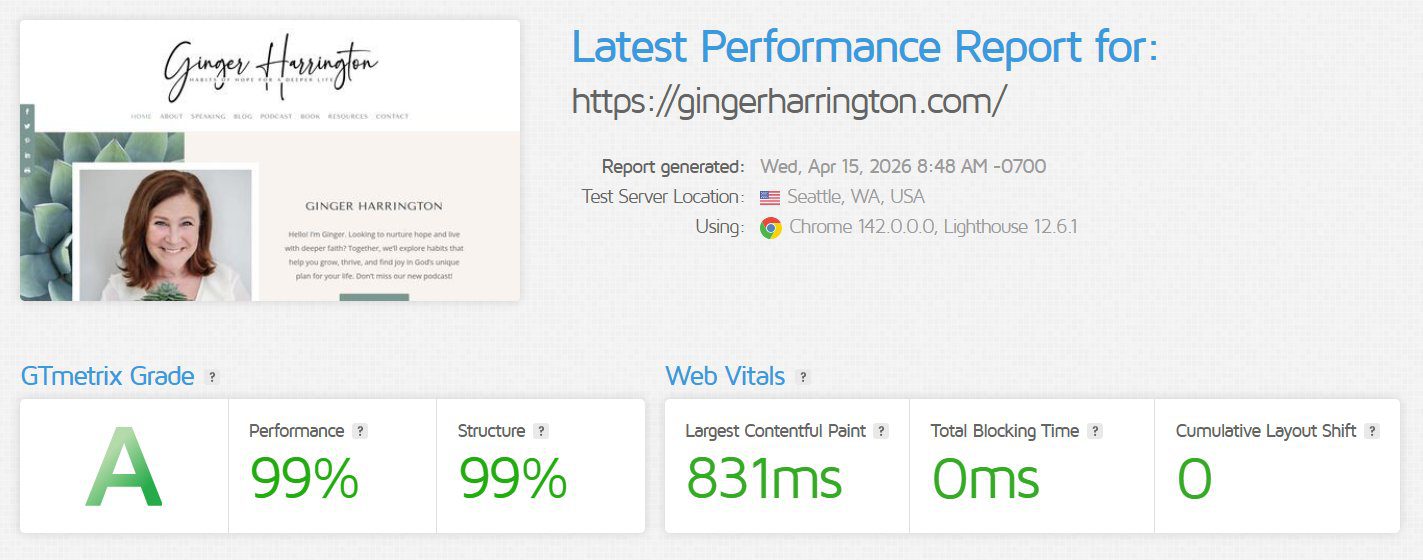
The result: the grade jumped to a 99% A, and the server response time dropped by roughly 10x.
Same site. One change. That’s the whole story, and it’s worth understanding, because it points to something most people get wrong about website speed.
The site we’re talking about
The site belongs to Ginger Harrington, an author and speaker. It’s a genuinely well-built WordPress site. Clean design, good structure, nothing sloppy under the hood. This was not a rescue mission. This was a good site that was already performing reasonably well.
That’s exactly why this example is useful. It’s easy to make a broken site faster. You fix the obvious problems and the numbers climb. What’s harder to explain, and more revealing, is what happens when you take a site that’s already doing well and change nothing but the ground it stands on.
Before the move, Ginger’s site was on our BASIC+ plan. I want to be clear about something here, because it matters. BASIC+ is a strong plan. It’s managed WordPress hosting, and it runs circles around the cheap shared hosting most people land on at the big-box hosts like GoDaddy or Bluehost. The difference is in how it’s managed: proper caching, security, updates, and a server that’s actually looked after. A well-managed shared plan is a real, legitimate home for a lot of websites.
But shared hosting, even good shared hosting, has one quality built into it that no amount of management can fully remove. We’ll get to that. First, look at what the numbers actually showed.
The “before” that looked fine (but wasn’t telling the whole story)
Here’s where it gets interesting. The GTmetrix grade said B, 78% performance. If you stopped there, you’d shrug and move on.
But a single speed test is one snapshot, taken at one moment, under whatever conditions happened to exist right then. It’s like checking traffic once and deciding that’s what your whole commute is like. The real picture comes from watching the site over time, under real conditions, with real traffic hitting it.
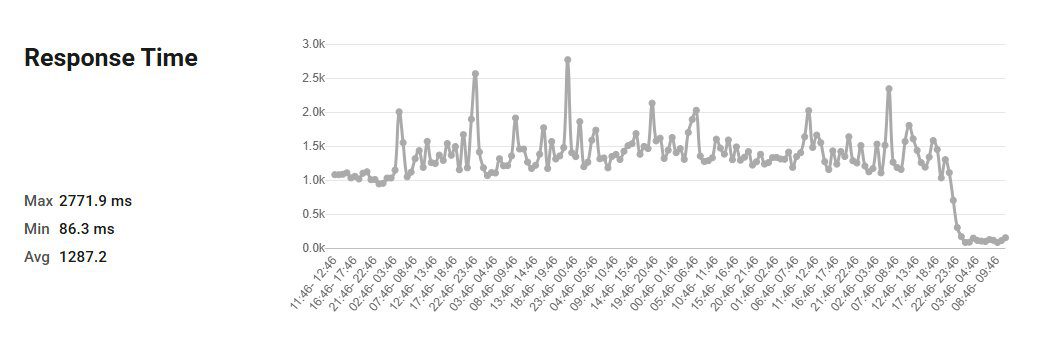
So we did. We monitored the server response time, the amount of time the server takes just to start responding to a request, before a single pixel of the page even begins to load. Over that window, here’s what we saw on the shared environment:
- Average response time: about 1,287 milliseconds. Nearly a second and a half just to begin responding.
- Peak response time: 2,771 milliseconds. Almost three full seconds on the worst spikes.
- And the pattern was volatile. The response time jumped around constantly, spiking up and settling down and spiking again.
That volatility is the part the B grade never showed. Your visitors don’t experience your average. They experience whatever they get in the moment they arrive. And if that moment lands on a spike, they’re staring at a blank screen for nearly three seconds, which in web terms is an eternity. Plenty of them leave before the page ever finishes.
So the “before” wasn’t bad, exactly. It was inconsistent. And inconsistent is its own kind of slow.
What we changed: nothing but the environment
This is the important part, so I want to state it plainly.
We moved the site to a dedicated hosting environment. That’s it. That’s the entire change.
- Same theme.
- Same plugins.
- Same content.
- Same images.
- Same code.
- No other optimization work of any kind.
If anything else had changed, this wouldn’t be worth writing about, because you couldn’t tell what caused what. The reason this example is useful is that it’s a clean test. One variable. Everything else held exactly the same.
The “after”: the part that makes people do a double-take
After the move to the dedicated environment, we ran the same tests.
The GTmetrix grade went from a 78% B to a 99% A. Performance and structure both at 99%. Total Blocking Time dropped to zero. The layout-shift score cleaned up to zero as well.
But the grade isn’t the headline. This is:
That server response time, the one averaging around 1,287ms with spikes near 2,771ms, dropped to a flat line hovering around 150 milliseconds. And it stayed there. The volatility disappeared. No more spikes. Just a consistent, fast response, request after request.
From roughly 1,287ms to roughly 150ms. That’s about a 10x improvement in how fast the server starts responding.
And remember, we didn’t optimize anything on the site to get there. The site was capable of this speed the whole time. It was being held back by the environment it was sitting in.
So why does a dedicated environment do this?
Here’s the actual explanation, because understanding it will change how you think about your own site.
On shared hosting, your website lives on a server alongside other websites. You’re all drawing from the same pool of resources, the same CPU, the same memory. Most of the time that’s fine. But when one of the other sites on that server gets busy, or runs something demanding, everyone else feels it. Your site’s response time slows down, not because of anything you did, but because of what’s happening around you.
This is often called the “noisy neighbor” problem, and it’s the source of that volatility we saw in Ginger’s before-numbers. Those spikes to nearly three seconds weren’t her site’s fault. They were the server getting crowded.
And here’s the key point, the one that reframes this whole conversation: no amount of on-site optimization fixes this. You can compress every image, minify every script, install the best caching plugin on the market, and you still can’t do anything about a backend that’s competing for resources with a dozen other sites. The ceiling isn’t in your site. It’s in the environment.
A dedicated environment removes the competition. The resources are yours. Nobody else’s traffic touches your response time. That’s why the numbers didn’t just get faster, they got consistent. Fast and steady, instead of fast-sometimes and slow-other-times.
That’s the quality shared hosting can’t fully escape, even when it’s managed well. Good management makes shared hosting strong. It can’t make it dedicated.
Who actually needs this?
I’m not going to tell you every website needs to move to a dedicated environment, because that’s not true.
If you’re running a brand-new blog with a handful of visitors a month, a well-managed shared plan is genuinely the right call. You’d be paying for headroom you don’t need yet.
This matters when your site is doing real work. When you’re getting meaningful traffic and you can feel the lag. When you’ve already optimized everything you can on the site itself and something still feels slow. When you’re running a business on your site and consistency isn’t a nice-to-have, it’s the difference between a visitor staying and a visitor leaving. When those slow spikes are quietly costing you readers, subscribers, or sales you never even know you lost.
If that’s you, the environment your site lives in is probably the single biggest lever you have left. And it’s one most people never think to pull, because they assume all hosting is basically the same. It isn’t.
Where to go from here
If you read all of this and thought about your own site, that’s the right instinct. You might be doing everything right and still be capped by where your site lives.
Our PERFORMANCE and PERFORMANCE+ managed hosting plans are the dedicated environments built to do exactly what you saw here: fast, consistent server response, with your resources reserved for your site and nobody else’s.
If you want to talk it through before deciding, that’s easy to do. You can:
- Start a chat right here on the site and ask me anything.
- Reach out through the contact page, where you can also schedule a time to talk it through with me directly if you’d rather have a real conversation about your situation.
- Or if you already know this is the move, you can get started on a plan at fistbumpmedia.com/wordpress-support-plans.
Here’s the one idea I want to leave you with. Hosting isn’t a commodity you pick by finding the lowest monthly price. It’s the foundation everything else on your site sits on top of. You can build something beautiful and optimize it to the last detail, and still leave real speed, and real results, on the table simply because of where it’s hosted.
Ginger’s site was already good. Changing where it lived made it fast. That option is sitting there for most sites, waiting.
by Dan King | Jun 18, 2026 | business strategy, publishing strategy
Here’s a question I got more than once while writing these: why not just write one AI systems book? Wouldn’t that reach more people?
Maybe. But it would also be wrong.
Here’s the problem I kept running into, watching how people actually try to use AI in their work. A pastor prepping a sermon doesn’t have the same problem as a small business owner trying to fix their marketing funnel. A blogger trying to protect their voice doesn’t have the same problem as someone trying to scale customer support. The tools might overlap. The underlying problem doesn’t.
Most AI content treats all of that as one audience with one set of prompts. That’s why so much of it feels useless the moment you try to apply it to your actual work. It wasn’t written for your actual work. It was written for “everyone,” which means it was really written for no one.
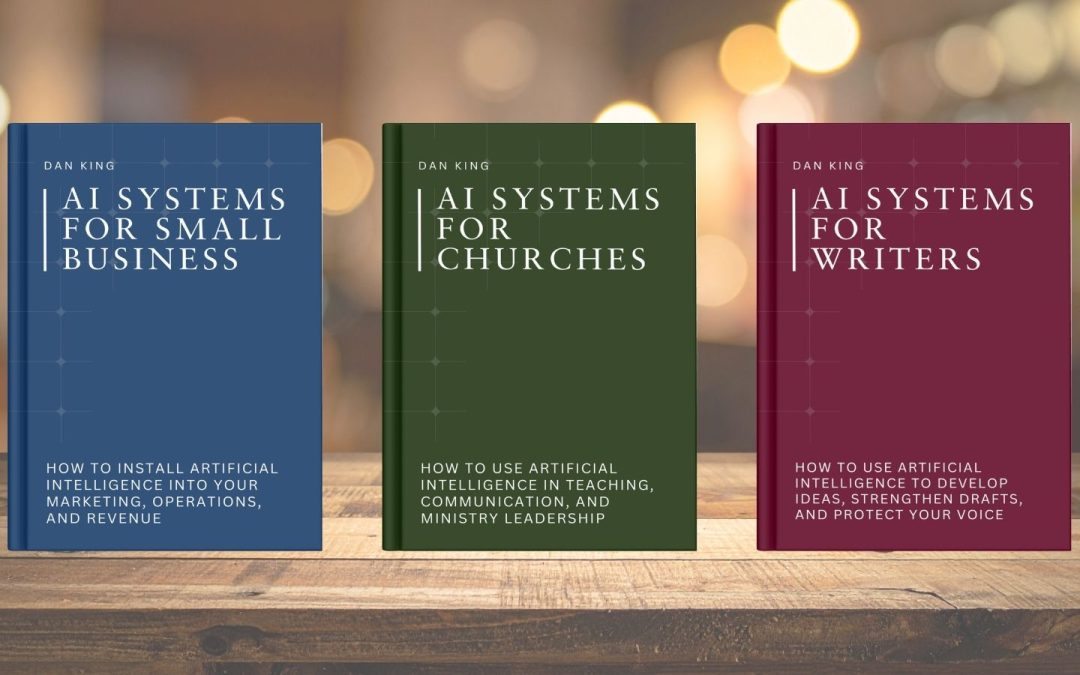
So instead of one book trying to be everything to everyone, I wrote three. Each one built around a specific problem, for a specific audience, with a specific path forward.
The Problem Underneath the Problem
Before getting into the books themselves, it’s worth naming the deeper issue, because it’s the same one across all three.
Most people’s relationship with AI right now looks like this: they open ChatGPT or Claude when they remember to, type something in, get an output, and move on. No system. No consistency. No real integration into how they actually work day to day. It’s a novelty they reach for occasionally, not infrastructure they rely on.
That’s not a failure on their part. It’s because almost nothing out there teaches AI as a system. It’s all prompts. Tips. “10 ChatGPT hacks.” None of it answers the actual question, which is: how do I build AI into the way I already work, so it makes my work better instead of becoming one more thing I have to manage?
That’s the question all three books answer. Just for three very different “how I already work.”
AI Systems for Small Business
The problem: You’re running a business with limited time, limited staff, and a marketing and operations workload that never stops growing. AI feels like it should help, but every piece of advice you’ve found is either too generic to apply or too technical to act on without a developer.
What’s inside: This book walks through installing AI into the systems that already run your business: marketing, content, sales, data, and operations. It includes a chapter specifically on rebuilding your marketing foundation when your audience or positioning has shifted, which is a problem I went through myself and rebuilt my own business around. Every chapter follows the same structure: the strategic thinking behind it, the system you build, a practical workflow, an action step you can do immediately, and a way to measure whether it’s actually working.
This isn’t theory. It’s the same approach I use running Fistbump Media, documented so you can install it in yours.
AI Systems for Churches
The problem: Ministry leaders are stretched thin, usually without a communications team, a research staff, or the bandwidth sermon prep and weekly communication actually demand. AI could help close that gap. But most AI advice doesn’t account for what’s actually at stake in ministry work: the integrity of the message, the authenticity of the pastoral voice, and the weight of getting it right.
What’s inside: This book installs AI into five ministry systems: sermon and teaching preparation, church communication, discipleship and programming, administration, and data-informed decision making. It’s built around a framework I call the AI Operating Stack, with layers for thinking, creating, optimizing, and applying intelligence to ministry work, each one building on the last. And it doesn’t shy away from the hard questions. There’s a dedicated section on guardrails: ethics, theology, and oversight, because using AI responsibly in ministry means thinking carefully about where the line is, not just where the efficiency is.
The teacher is still the teacher. The Word is still the Word. AI doesn’t replace any of that. It handles the operational weight around it so the people doing the actual ministry can focus on what matters most.
Check out: The AI Tech Stack That Can Transform Your Church’s Ministry (For About $31/Month)
AI Systems for Writers
The problem: You want to write more, research faster, and build your audience without losing the thing that makes your writing yours. Most AI writing advice pushes you toward exactly that loss: generic prompts that produce generic drafts that sound like everyone else’s generic drafts.
What’s inside: This book covers idea development, research, outlining, drafting, editing, and audience building, all built around protecting your voice instead of replacing it. It’s the system I use for my own writing and the one I teach inside AI Author Lab, expanded into a full operational guide. If you’ve read any of my recent posts on using AI inside WordPress, this book is the deeper system underneath that workflow.
What All Three Have in Common
Different audiences, different problems, same architecture. Every book in the series follows a three-part structure: strategic foundation first, then system installation, then an implementation roadmap so you actually execute instead of just reading and nodding along.
And every book shares the same core philosophy, which is really the whole point of the series: AI is augmentation, not replacement. Systems over prompts. A human still in the loop. Outcomes you can actually measure.
That’s the difference between AI as a novelty and AI as infrastructure. The novelty wears off. The infrastructure compounds.
It’s also why these books aren’t written for developers or AI specialists. One early reader of AI Systems for Churches put it better than I could in his own review:
“While readers looking for deep technical instruction may find the material introductory, that is clearly not the book’s purpose. Its audience is church leadership, not software developers. In that role, the book succeeds admirably by offering a practical starting point for thoughtful engagement with AI.”
That’s true across the entire series, not just the church book. None of these are written to make you a prompt engineer. They’re written to help you build a system you’ll actually use, whether you’re leading a church, running a business, or building an audience as a writer. The goal was never technical depth. It was operational clarity.
Where to Start
If you recognized your own problem in one of these descriptions, that’s the book to start with. You don’t need to read all three. Each one stands completely on its own, built for the specific work you’re actually doing.
The full AI Systems Series is available now on Amazon: AI Systems for Small Business, AI Systems for Churches, and AI Systems for Writers.
If you’re a blogger or content creator working through AI Systems for Writers, AI Author Lab is where that system gets built out further with hands-on support. If you’re a small business owner working through the Small Business book, AI Entrepreneur Lab does the same.
by Dan King | Jun 10, 2026 | blogging strategy
Most bloggers using AI are doing it wrong. Not because they’re using the wrong tool, but because they’re using it at the wrong point in the process.
They open Claude or ChatGPT, type “write me a blog post about [topic],” paste the output into WordPress, and wonder why it doesn’t rank. The problem isn’t the AI. It’s that they skipped everything that makes a blog post rank before the writing even started.
This post is about fixing that. It’s a practical workflow for bloggers who want to use AI to write faster without sacrificing the things Google actually rewards.
What Google Rewards in 2026 (And Why Most AI Posts Miss It)
Before we get into the workflow, it’s worth being clear about what you’re actually trying to produce.
Google’s ranking criteria hasn’t fundamentally changed: it rewards content that demonstrates real experience and expertise, matches what the searcher actually wants, is structured so both humans and search engines can follow it, and comes from a source it has reason to trust.
What’s changed is that generic content is now easier than ever to produce and easier than ever to spot. A post that technically answers a question but adds no original perspective, no real-world context, and no voice gets outranked by one that does, regardless of which one used AI to help write it.
The fix is building AI into a workflow that produces the first kind of post, not the second.
The Workflow: Five Phases
Phase 1: Start With the Search, Not the Topic
Before you open any AI tool, get clear on what your target reader is actually searching for. This sounds obvious, but most bloggers skip it and pay for it in rankings.
Pick your topic. Then search it in Google and look at the top five results. What angle are they taking? What questions are they answering? What’s in the “People Also Ask” section? What are they not covering that you could?
You’re looking for two things: what the ranking content has in common (that’s what Google expects to see) and what’s missing (that’s your opening to rank above it).
Once you have that picture, bring it into your AI conversation. Don’t just say “write a post about X.” Say “here’s what the top-ranking content on this topic covers, here’s the gap I want to fill, and here’s the angle I want to take.” That context is what separates a useful AI draft from a generic one.
Phase 2: Build the Outline Before You Build the Draft
This is the most important phase and the one most people rush through.
A good outline isn’t just a list of headers. It’s a decision about what to argue, in what order, with what evidence. Getting this right in conversation with an AI before you start drafting saves you from the most common AI writing problem: content that covers everything superficially instead of anything deeply.
Work through your outline in a back-and-forth conversation. Push back on sections that feel generic. Ask the AI what a skeptical reader would want to see addressed. Ask what the post is missing. The goal is an outline you’re confident in before a single sentence of the actual post gets written.
Phase 3: Draft With Your Voice Loaded
This is where most people start, which is why most AI content sounds the same.
If you want AI-assisted content to sound like you, you have to give it something to work from. That means loading your voice into the conversation before you ask it to write anything. A few examples of your own writing, a description of your tone and audience, the things you never say and the things you always do: all of that context produces a draft that sounds like a starting point you can work with rather than a piece you have to rewrite from scratch.
Draft section by section, not all at once. Review each section before moving to the next. Add your own examples, your own experience, your own opinions. Those are the things AI can’t generate and the things Google’s E-E-A-T criteria specifically look for.
Phase 4: Optimize Before You Publish
Once the draft is solid, run it through the finishing workflow we covered in the previous post on using AI inside WordPress 7:
- Review Notes for editorial gaps, readability, and SEO issues
- Title Generation to pressure-test your headline
- Excerpt and Meta Description generation as a starting draft
- Alt Text on every image
These are the publishing tasks that eat time and are easy to shortcut badly. Let the AI handle the first draft of each one, then review and adjust.
One more thing before you hit publish: make sure your site itself isn’t working against you. A well-written post on a slow or technically weak site has a harder time ranking than it should. If you haven’t checked your site’s technical health recently, run it through the free website grader and see where you stand. Performance issues, mobile problems, and SEO gaps at the site level affect every post you publish.
Phase 5: Publish, Then Watch
Publishing is not the finish line. It’s the starting gun.
After a post goes live, give it four to six weeks and then check your Google Search Console data. What queries is it showing up for? What’s the average position? What’s the CTR? That data tells you whether the search intent match was right, whether the title is earning clicks, and whether there are related queries you could address in a follow-up post or by expanding the existing one.
AI is useful here too. Bring your GSC data into a conversation and ask it to help you interpret what’s working and what to adjust. That feedback loop is what makes each post better than the last.
The Part AI Can’t Do For You
All of this assumes one thing: that you have something worth saying.
AI is a workflow tool. It makes research faster, outlining cleaner, drafting less painful, and publishing more consistent. What it doesn’t do is generate genuine expertise, real experience, or an original point of view. Those have to come from you.
The bloggers who are winning with AI right now aren’t the ones who figured out how to automate content production. They’re the ones who figured out how to use AI to get their actual knowledge and perspective out faster and in a form that search engines can find and rank.
That’s the workflow. Use AI to remove the friction. Keep yourself in the work. Publish things that are genuinely useful. The rankings follow.
If you want a structured system for building this workflow around your specific niche and audience, including voice documentation, content strategy, and repeatable publishing processes, that’s exactly what AI Author Lab is built around.
by Dan King | Jun 5, 2026 | blogging strategy
If you’ve been following the WordPress 7 AI rollout, you’ve probably noticed something: the conversation keeps mixing two very different things together.
On one side, you’ve got the AI features built directly into the WordPress editor: title generation, excerpt generation, review notes, alt text. Useful, lightweight, right there when you need them.
On the other side, you’ve got external AI tools like Claude and ChatGPT that you use in a separate tab, before your content ever touches WordPress.
Most of the coverage treats these as competitors. They’re not. They do different jobs. And if you’re trying to build a real content workflow, you actually need both, but in very specific places.
Here’s how to think about it.
What the WordPress Editor AI Does Well
The AI features built into WordPress 7 (via the official AI plugin) are designed to work on content that already exists. You write the post, then the AI helps you finish it off:
- Review Notes flags grammar, readability, and SEO gaps block by block
- Title Generation gives you headline options based on what you wrote
- Excerpt Generation drafts your post summary automatically
- Alt Text Generation writes descriptive alt text for your images
- Meta Description produces an SEO-friendly description ready for your SEO plugin
The pattern here is consistent: these tools react to your content. They help you polish, package, and publish what you’ve already created.
That’s genuinely valuable. These are the finishing steps that eat up time on every post, and having AI handle the first draft of each one speeds up the back half of your publishing process significantly.
But notice what’s missing from that list: the actual writing.
What the WordPress Editor AI Doesn’t Do
The WordPress editor AI doesn’t help you figure out what to write about. It doesn’t help you outline a post, research an angle, find the right way to open a piece, or work through a section that isn’t coming together. It doesn’t know your audience, your voice, your positioning, or the specific point you’re trying to make.
It responds to finished content. It doesn’t help you create it.
That’s not a criticism, it’s just an accurate description of what it was built for. The editor is where you publish. It makes sense that the AI there is focused on publishing tasks.
The problem is that for most bloggers and content creators, writing is the hard part. The metadata is the easy part. If AI can only help with the easy part, you’re leaving most of the value on the table.
Where External AI Tools Actually Fit
Tools like Claude (at claude.ai) and ChatGPT live outside WordPress entirely, and that’s exactly where they belong in your workflow, before the post exists.
Here’s what that looks like in practice:
Topic and angle development. Before you write a word, you’re working with an external AI to figure out what angle to take, what the post is actually arguing, and whether there’s a gap in the existing content on that topic worth filling. This conversation happens in Claude or ChatGPT, not in WordPress.
Outlining. A good outline isn’t just a list of headers. It’s a decision about what to include, what to cut, and what order creates the most logical flow for the reader. External AI is a strong thinking partner here precisely because you can push back and forth until the structure is right.
Drafting and voice. If you use AI to help draft sections of a post, you need a tool that can learn your voice, hold context across a long conversation, and respond to feedback. That kind of back-and-forth collaborative drafting requires a full AI assistant, not an in-editor button.
Research and fact-checking angles. External tools let you dig into a topic, ask follow-up questions, and pressure-test your assumptions before you commit them to a post.
By the time you paste your draft into WordPress, the hard work is done. Then the editor AI takes over for the finishing pass.
The Workflow, Put Together
Think of it as two distinct phases:
Phase 1: Before WordPress (external AI)
- Decide on the topic and angle
- Build the outline
- Draft the content collaboratively
- Refine for voice and accuracy
Phase 2: Inside WordPress (editor AI)
- Run Review Notes before publishing
- Generate and choose a title
- Generate and edit the excerpt
- Generate alt text for images
- Generate the meta description
Two tools. Two phases. Zero overlap.
The mistake most bloggers make is trying to use one or the other for everything. They either ignore the editor AI entirely (and keep doing all the metadata work manually), or they rely on it for everything and wonder why their posts feel thin and generic. Neither approach works.
A Practical Note on Which External Tool to Use
For text-based content work, Claude tends to produce more natural, nuanced writing with less editing needed, and it handles longer, more complex drafts well. ChatGPT is fast, widely used, and strong for structured outlines and quick research. Both are solid. Most working bloggers end up with a preference after a few weeks of actual use.
The important thing isn’t which one you choose. It’s that you build a consistent workflow around it: the same tool, the same approach, every post. That’s what makes the output start to sound like you instead of like a generic AI assistant.
If you want a structured system for building that workflow, including how to load your voice, develop your content strategy, and build repeatable processes around AI, that’s exactly what AI Author Lab is designed to walk you through.
The Short Version
WordPress 7’s built-in AI is a real time-saver for publishing tasks. Use it. But don’t mistake it for a content system.
A content system starts before the editor, with a clear process for developing, drafting, and refining posts using the right external tools. The editor AI finishes the job. It doesn’t start it.
Set up both. Use each one where it belongs. That’s the workflow that actually compounds over time.
Already using the WordPress 7 AI features and want to set up the external side of the workflow? Start with this post on what’s built into the editor and this one on how to use it, then come back here to build the system around it.